Download award-winning file recovery Mac software.
- Computer Tutorials and Links
- Converting An MDE To An MDB?
- Changing The Language Settings In Word 2007 And 2010
- Cutting Down On Spam, Spyware And Telemarketers
- Entering Foreign Characters In Word And Other Programs
- Finding Review Articles to Make Purchasing Decisions
- Fixing a disappearing Start menu, Start button and Taskbar
- Fixing CD and DVD Device Manager Error Codes
- Fixing CD/DVD Drive Problems With 18 Freeware Tools and Scripts
- Making An Image Map From An SVG File
- Recovering A Corrupt Excel File
- Recovering a Corrupt Microsoft Money File
- Recovering a Nonfunctioning CD Drive
- Recovering Text From A Corrupt Word Docx File
- Recovering Text From Corrupt Word Documents - in general
- Removing Oil Stains From Flag Stone and Concrete
- Repairing Open Office Files
- Restoring the Volume Control to Your Windows System Tray
- S2 Services - my data recovery freeware site.
- saveofficedata.com - my free office file recovery service
- Speeding Up A PC
- Wraping Text Around A Round Object In Word
- Using A Stone Set Ring Enlarger
- Arts
- Brockco Animations
- Family News Letter Satires
- Graphics Portfolio
- Graphics Portfolio2
- Ice-Storm - tweener book.
- Jenny and the Silly Monkeys - children's book .
- Secret Santa - children's book
- Socks - children's book .
- Sublime Songs - my music list.
- Ideas
- Epinasty
- Genealogy of Life - what if the tree of life was like a human genealogy where hybridization led to speciation?
- Gods, Kings and Heroes -genealogy trees of every type except the ordinary. Under construction.
- Plant Hormone Speculations
- Scriptural Evolution
- Scriptural Physics
- Plant Senescence Theory
- Socrates/Plato's Political Cycles
- Toward a New Synthesis of Science and Evangelical Christianity Google Group
- Links to Other Family Members' Sites
- Faith & Courage in a Time of Trouble - a book by my mother about her experiences during World War II hiding from the Nazis.
- International Education Associates Web Site - my mother's web site
- The Day of Small Things - The 1st book about my great-grandmother's experience as a missionary in China.
- Two Magic Pearls - text with a machine read recorded audio version.
- Up From Zero In North China Final - The 2nd book about my great-grandmother's experience as a missionary in China.
Round Pictures
In Microsoft Office?
Making Images of Any Shape
and in Word, Publisher Power-
Point, FrontPage and Excel and
Wrapping Text Around them
By Paul Pruitt - MCP, CompTIA A+, CompTIA Net+, HDI Helpdesk Analyst
These steps are like an online university class in creating images.
Here are the steps to producing AutoShapes containing pictures in MS Office. The circle/ellipsoid tool is used as an example, but any AutoShape can be used (there are many on the Drawing Toolbar). You can wrap text around any of these shapes. See the figure at left.
To view this document in Word format with samples you can play around with, go to: http://www.socrtwo.info/round.doc.
Also see: http://www.computorcompanion.com/
LPMArticle.asp?ID=158.
Steps
-
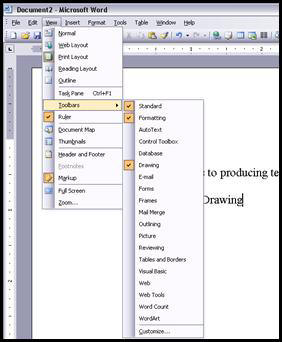 Be sure your Drawing Toolbar is viewable. See the screenshot at left.
-
Insert your picture into the document through the Insert Menu.
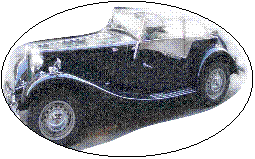
Choose Insert -> Picture -> From File.
I will use a picture of a car below.

-
Select the ellipsoid on the Drawing Toolbar and draw a circle or ellipse on your screen to the size you want. Holding down the shift key allows you to draw perfect circles. (My Drawing Toolbar is attached to the Status Bar on the bottom of the screen; yours may be up top or floating See below.)

-
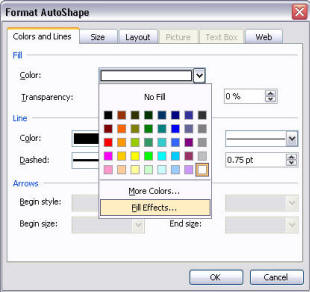
To add an image to this AutoShape, click to select it and then right click on a line of the circle/ellipse and choose Format AutoShape. Choose the Color and Lines tab. Click the drop down on the Fill option and choose Fill Effects.
-
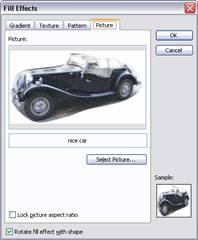 In the Fill Effects dialog box, click the Picture tab and browse to locate the picture you want to insert. The picture you choose will be inserted within the boundaries of the AutoShape you've selected. (Note I'm using a different picture of the car, in this one, I got rid of the street scenery).
-
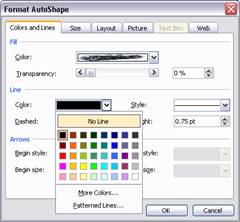 Next keeping your cursor over the line of the circle/ellipsoid again, select it with the left mouse button, and then right click and choose “Format AutoShape”. Next Choose the Colors and Lines Tab and Choose the color of the line to be “No Color”. Don’t change the color of the fill of the circle/ellipsoid. Note that this step could have been done as soon as you drew the circle/ellipsoid, way back in Step D. See the figure on the left.
 -
To get extra tight text wrapping, click the Advanced Button on the lower right hand corner of the Layout Tab after you have chosen the “Tight” Wrapping. Next choose the “Text Wrapping” Tab of the Advanced Layout Configuration Window that appears. All the way at the bottom, change the “Distance from the Text” Measurements, to 0” from .12” or whatever default you have. See below.
-
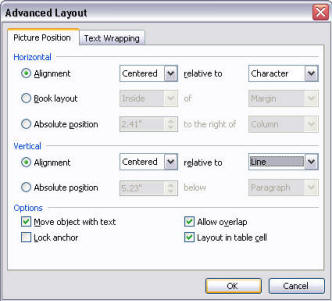
If you have trouble positioning your image (the image refuses to leave the borders of the page), open up the Format AutoShape again by right click on the previously selected objects line again. Choose the Layout Tab again, choose the Advanced Button and then the "Picture Position" Tab. Change various elements of the vertical and horizontal alignment parameters to see if you can get the image to behave as you would like.